Monday, April 27, 2009

Studio Envy

Serious Studio Envy, that is. Currently, I have my big loom in the dining room - with boxes of stuff for other crafts piled around the loom, and one area with my warping wheel, floor inkle loom and takadai. The spinning wheel lives on the hearth in front of the fireplace mantle in the living room. My fiber stash is in bins in a storage shed in the back yard. My small loom is in a corner of the family room. (Because the big loom is in the dining room, the dining table is in another corner of the family room.) This means that when I need to use something, I have to dig it out, use it, and be sure to put it away. Not fun.

For several years now, I've dreamed of getting a studio. Wherever I go, I seem to be using the back part of my mind to evaluate spaces -"oooh, now that would make a wonderful studio!" "oooh, look at all that space!" I've gotten the issues of Cloth,Paper, Scissors on crafts studios, browsed online to see storage ideas for crafts. I heart Sara's yurt big time. Ditto for Verda's second floor studio with one wall of windows, and one wall of cabinets, and a huge worktable in the middle.

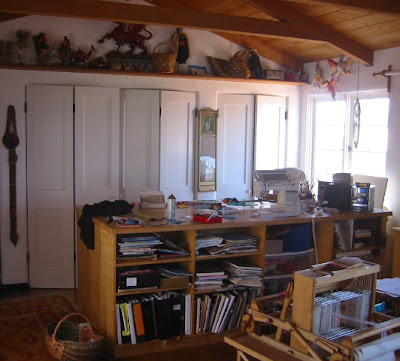
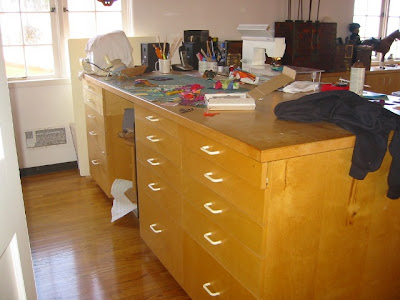
The other day, I got to see my friend Gay Sinclair's studio, and it fits my dream image to a tee! She let me come over and take a few photos (and gave me permission to use them here.) I intend to put them on my treasure map for the coming year (aka visioning board) and see if I can manifest something like that for myself. Who knows, my beloved 24 year old son might decide he's ready to launch out on his own, and I can transform his room. We'll see. But back to Gay's space...When you walk in the door, to your left is a closet wall with folding doors. Adjacent to that wall is a wall of windows with cabinets below. In the space in front of the doors is the most *amazing* worktable. The top is 4' by 8' - the size of a standard sheet of plywood. On the side you can see here, she's got shelves for notebooks and stuff. There's a cutout area where she's got her sewing machine. And here's a view of the other side of the table - this one has lots of drawers.

On the other end of the room, there are French doors to an enclosed patio area. Sitting out there, you get a beautiful view of the ocean and that magical sea smell that wafts on the breeze.
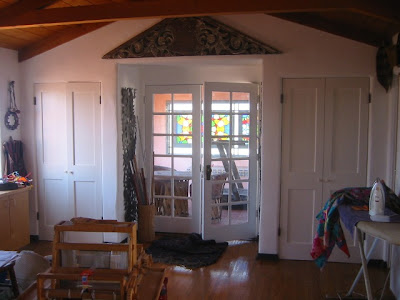
I suspect there are several reasons this appeals to me so much. I adore french doors, for one thing, and lots of natural light. I like white walls and woodwork, and light colored woods. (My photo of the cabinet/window wall came out too dark, though you can see one corner of the cabinets here.) Also, there are some amazing "items of interest" - Gay and her husband Bob collect amazing ethnic items, and their home is a feast of fascination.

Gay's loom is downstairs in another room, though her table loom is up here, and I imagine this is primarily her quilting space. I love it, though, and I love the feeling I get looking at these images.

(P.S. She has a rose garden in the patio you walk through to enter the house, and the fragrance of her roses is amazing!)

Saturday, April 25, 2009

Slow But Sure

I got the warp beamed on the David loom, then went to look for my 8 dent reed. I could *swear* I bought one after the double weave workshop Jennifer Moore taught here a few years ago. Darned if I could find it, though. I have an 8 dent reed for the big loom. I had an 8 dent reed for the table loom, but after I sold that, I also sold the reeds on ebay. But alas, when I searched through my 36" reeds, I have 20, 15, 12 and 10 epi. No 8.

Thank heavens for friends. Gay Sinclair loaned me her reed, so I'm back in business. I just finished threading and I'm getting ready to sley the reed. While I'm at it, I thought I'd share a few pictures.

One of my favorite things about Louet looms is the built-in raddle on the castle. But my favorite use for it is shown here - I hang cords on either side of the loom from the raddle, and use the cords to hold my lease sticks, or as you can see here, the stick with velcro that I use for sectional warps. Nice and compact. When I'm done warping, it's easy to slip the cords off and put them away.
And here's another of my favorite "found" tools. One of our dearest friends is a Frenchman named Alain - whenever he comes to visit, he brings the most wonderful champagne, and it comes with these ribbons on the bottles. I've got a drawer full of them, and they are SO handy!

One of the great hints I learned from Kati Meek was to lay the reed horizontal so it's easy to sley with an autodenter. Previously, I've used sticks across the front and back beams, with the reed laying on the sticks. This loom has a hanging beater, and I wondered if I could just secure the reed to the bottom edge of that, using the champagne bands. Voila! It worked! I used some long purple rubber bands to bring the beater forward to a vertical position. Since you can remove the breast beam on this loom, I expect sleying to be very fast and very easy.


I love found tools. I love finding ways with each new warp to make things faster and easier. I love rubber bands. Actually, I love plastibands - rubber bands get brittle too fast here with the frequent Santa Anas that dry things out so much. I like boxes and bags and finding the perfect container for things. I love the iPod shuffle I recently got, and listening to podcasts while I work at the loom or walk the dog. Life is good.

Friday, April 17, 2009

In the Meantime

I'm halfway through beaming a new warp on the David loom. I decided I like the teapot/teacup design from the taquete experiments the most, so I'm going to weave some tea towels.

In the meantime, I've been doing a bit of knitting. At the Unity Center a few weeks ago, they announced that a class of school kids was doing a recycling project. They were taking plastic grocery sacks and making "plarn" - aka plastic yarn, and their plan is to make at least 12 shopping bags to give to the school board members on Earth Day. They learned to crochet, but it was going slowly so they asked for help. I volunteered to make a bag.

When I got the plarn, the instructions said to use a size N crochet hook. The largest I have is a K, and using that seemed really hard on my hands. So.... I got out my size 15 knitting needles and decided to knit a bag instead. Much easier!!! I made a simple rectangle with 5 or 6 rows of garter stitch, a large rectangle of stockinette, about 10 rows of garter stitch for the bottom of the bag, another rectangle of stockinette, and then finishing with another 5 or 6 rows of garter for the top of the bag. I kept 2 stitches of garter on either side of the stockinette rectangles to keep it from curling too much. When the knitting was finished, I used a crochet hook to make the sides of the bag and handle. The sides are filet crochet and the handle is double crochet.

I'm glad I only volunteered to make one. It was fun, but weird.

I've also got another knitting project in the works - my mother loves turquoise and I bought some gorgeous turquoise alpaca yarn on ebay a while back. I'm knitting her a scarf since she frequently feels chilled. I saw a V shaped scarf in a library book, but modified it a bit. This is a simple pattern. For the first "leg" of the V, you alternate two rows. In row one, you knit front and back in the first stitch, then alternate purl 2, knit 2, and at the end of the row, when you have 3 stitches left, you knit 1 and then knit 2 together. Row two, coming back, you simply alternate purl 2 and knit 2. When you're ready to turn the corner of the V, you simply change Row one of the pattern. You K2tog at the beginning, and knit front and back in the last stitch. You can see from this photo that I've just recently turned the corner. I like the subtle rib that seems to make this warmer than you'd expect from a lightweight scarf.

Hopefully, I'll have tea towel progress to report soon, plus news on the big loom, which has been idle for too long.

Saturday, April 11, 2009

Where There's a Will....

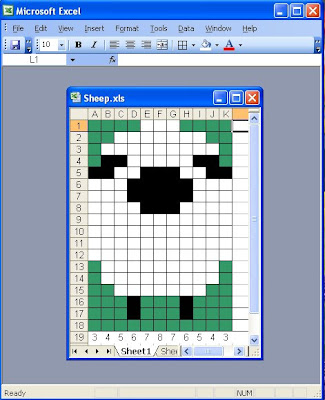
Here's yet another way to do a charted grid design.

Yep, it's a spreadsheet. Select columns A-K and set the column width to 2. If you want, put the pattern shafts in the row below the design. Now select a fill color, then select a cell or group of cells and click on Fill to put that color in those cells.

The advantage to using a spreadsheet is that you can add notes and a title if you want. It's a little more cumbersome to fill the squares with color, but the main disadvantage is that you can't import it into other graphics programs or weaving software. But if you're making a chart you are going to use manually, it works fine.

Note that you can do something identical by creating a table in Windows and setting the column sizes so you get small squares, then selecting cells and clicking on Fill. Like I said ..... where there's a will.... :-)

Another Way to Do Design Grids

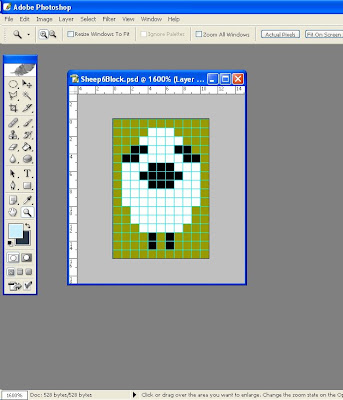
Sue mentioned that she has Fiberworks PCW Bronze, and apparently that doesn't have the sketchpad feature. So.... here's another option to try, if you've got Photoshop. (You can probably do this with Elements, too.)

Create a new file and set it's size to 11 pixels wide and 16 pixels high (or whatever dimensions you think you will need for your design.) Turn on a Grid that is set for lines between every pixel. Now increase the magnification to the max (1600%.) Now you can play with the pixels in the grid to your heart's content.

Note the magnification level in the bottom left corner - highlighting it and changing the value to 1600 is the fastest way to zoom all the way in.

Wednesday, April 8, 2009

Creating Taquete Designs

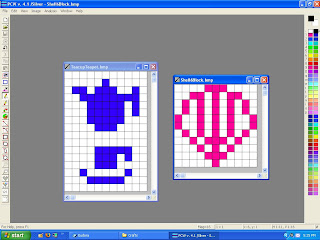
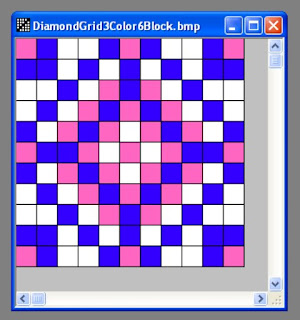
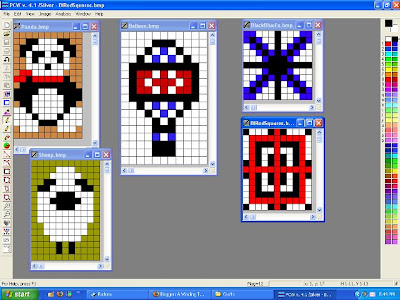
Here's how I do the charted designs for taquete. I use Fiberworks PCW, which has a wonderful little feature. You can create something called a sketchpad, which gets saved as a bitmap file. You can set the size of the grid and then enlarge it so it's easy to select the squares. For this, the grid is 11 squares wide, and the height I set depends on the design I'm creating. If you think of each column in the grid as representing a block, you could label the column with the number of the pattern shaft for that column -
3 4 5 6 7 8 7 6 5 4 3
but after you do a design or two, you don't need the label.


This is assuming that you have used a summer and winter threading with the blocks in point order. The shell design shown here is completely symmetrical so it can be woven with no pickup. The teapot and teacup both require a small amount of pickup for the handle of the cup and for the spout and handle of the teapot.

In both of these cases, I simply have a two color design - one color (white) for the background and one color for the pattern. You can also make a design with multiple colors - though if you get more than three or four, you're going to be juggling shuttles quite a bit!


If you want distinct designs that don't merge (assuming you have repeats of the blocks in point order), then create your design so the right and left columns are part of the background.

This is addictive!!!

Tuesday, April 7, 2009

More Taquete Experimenting

Today I cut off the taquete warp from the David loom. I've secured ends and the results are now in the washing machine, but before I tossed them in there, I took a few pictures.

First, here are the sheep - nice and fat after resleying the warp.


Then I began experimenting, beginning with Lillian Whipple's butterfly design from her workshop.


Remember my last post, where Sara was surprised at my using a knitted pillow top and sewing it to a commercial pillow? Well, I decided I wanted to focus on weaving taquete design strips on this warp, rather than whole towels, to make the most of the warp that remained. So... I started just weaving strips of designs. The plan is to hem them, and then sew them to - you guessed it - some commercial towels.

I wanted to create some of my own designs. I've got lots of shells and images of shells around my house. For taquete on 8 shafts, you can only have a 6 block design, so it was a bit challenging to do a design that looked like a shell, but I'm happy with the result.


Since a gold key is a special symbol for me, I tried those, using golden yellow linen for the pattern weft. As you can see, I started using off white for the background, but it's hard to see the keys (although the linen makes them pop out texturally, if not visually) so I tried again with dark blue for the background. I liked that better.


Moving along, I made a little house design, and then had the most fun creating a design for teapots and teacups. (That's my symbol for my sister, who I dearly wish lived closer so we could get together for tea.)


These look a little funky - I suspect they might look a little better after finishing. We'll see. Still, I had a wonderful time playing with making these designs. Makes me want to do more, too, although I may try this on the Megado next time so I can avoid the pickup process that slowed things down so much. In fact, I tried doing a celtic braid design, but that required SO much pickup that I finally gave up on it. I have patience, but I also do have my limits.